How to Summarize YouTube Videos in ChatGPT using Mantium Plugin Wizard
In this tutorial, we will learn how to understand long YouTube videos, summarize the content, ask questions, and use the data to generate fresh content - all in ChatGPT. We are going to use the Mantium Plugin Wizard to build the ChatGPT Plugin in a few clicks.
Introduction
Do you have long YouTube videos you need to watch, but would you prefer interacting with the text to ask questions about key highlights or summaries for a comprehensive overview of the content? Or perhaps you want to use the content to create new material, and ChatGPT doesn't have the necessary context?
Well, this tutorial will help you solve that by showing you how to build plugins that you can use to interact with transcripts from YouTube videos and save time from watching the video.
For this tutorial, we are going to interact with the Microsoft Build 2023 Keynote Speech . This video is over 2 hours long, and might take sometime to consume, hence why our solution is timely.
Prerequisites
- API Keys for OpenAI.
- Sign up for ChatGPT Developer Access, if you don't have access.
Create Datasets in Mantium
While we haven't officially launched a Mantium YouTube connector yet, we will work with the transcripts of the YouTube video.
If you don't have access to the transcript of the video, another approach will be to use the Mantium File connector to import the mp3 file, and use the Transcribe to Audio transform to generate the transcripts of the video. Read this tutorial here to learn more.
For this tutorial, I have prepared a word document with the full transcripts. Download the file, and let's use it to create a dataset in Mantium.
Upload the Word Document to Mantium
- Click Data Source on the left navigation bar to go to the Data Sources section.
- On the top right corner, select Add Data Source.
- From the list of Data Sources, select the Word Documents Data Connector.
- Provide the necessary details to label the Data Source and wait for the job process to complete.
- Complete the data upload process by uploading the Word document (.docx).
- Click the Finish and Sync button to finalize the setup and synchronize the data.
Create a Dataset in Mantium
- After the job is done, click on Create Custom Dataset.
- Provide a name for the dataset and click on Save.
Once the dataset is created, navigate to the Transform section to add transformations to the dataset.
Add Transformations
Split Text Transformation
After creating the custom dataset, navigate to the "Transform" section to add a couple of transformations. For this tutorial, we're going to be working with the "Split Text" transformation.
The "Split Text" transformation is used to split the content to get it ready to generate embeddings on that so that it doesn't go above the OpenAI recommendation.
Here's how to set it up:
- Click on Transform and select Split Text from the dropdown menu.
- In the Source Column field, add the content column. This is the column that contains the text data to be split.
- In the Destination Column field, type "segmented_text". This will be the new column that will hold the segmented text.
- Set "Split By" to "word". This means the text will be split at every word.
- In the "Split Length" field, type
500. This means the text will be split every 500 words, creating an additional row. - Leave the remaining configuration as default.
- Click on the Plus sign(+) to add the next transform. The job will run and split the text in the "content" column into smaller chunks of 500 words each, storing the result in a new column called "segmented_text".
Generate Embeddings
We are going to generate numerical representations(embeddings) of the segmented_text column. This embeddings is what we are going to ship to Redis (the Vector Database) for ChatGPT to query for response.
- Select the Generate Embeddings from the list of transforms.
- Configure the Source Column parameter by selecting the column containing the
segmented_text. - Configure the Destination Column parameter by specifying the new name for the column that will hold the embeddings.
- Configure the Embedding model parameter by selecting the LLM model to use for the embeddings.
- Enter the Max Token Length, you can leave the default value -
8191 - Configure the Credential ID parameter by selecting the appropriate credential from the list of available credentials in your Mantium account.
Now we have processed dataset that is ready for use in ChatGPT!
Create your App in Mantium
Quick Warning
- If you select the Standard option and have previously created a split_content column, ensure to pick this same split_content column in subsequent steps rather than the original text column. This will prevent the unnecessary expansion of your dataset, ultimately keeping your OpenAI usage costs in check.
- Ensure to select the Advanced option if you have Embeddings already.
Instructions
Please follow the link below to find instructions on how to create your Mantium apps. Note that we have the embeddings column already, so we will use the Advanced option when creating the app below.
Interact with your App in ChatGPT.
There are two ways to interact with your app in ChatGPT;
- Use Mantium's ChatGPT Plugin to Interact with your App.(Recommended)
- Setup your own OpenAI ChatGPT Plugin, if you have developer access - which means you have the ability to create plugins in ChatGPT.
Use Mantium's ChatGPT Plugin
Please follow the link below to find instructions on how to setup the Mantium official plugin.
Setup your Own OpenAI Plugin
Please follow the link below to find instructions on how to setup your own plugin.
Interact with the App in ChatGPT
Now, let's interact with the Plugin in ChatGPT. Here are some example prompts:
Prompt 1
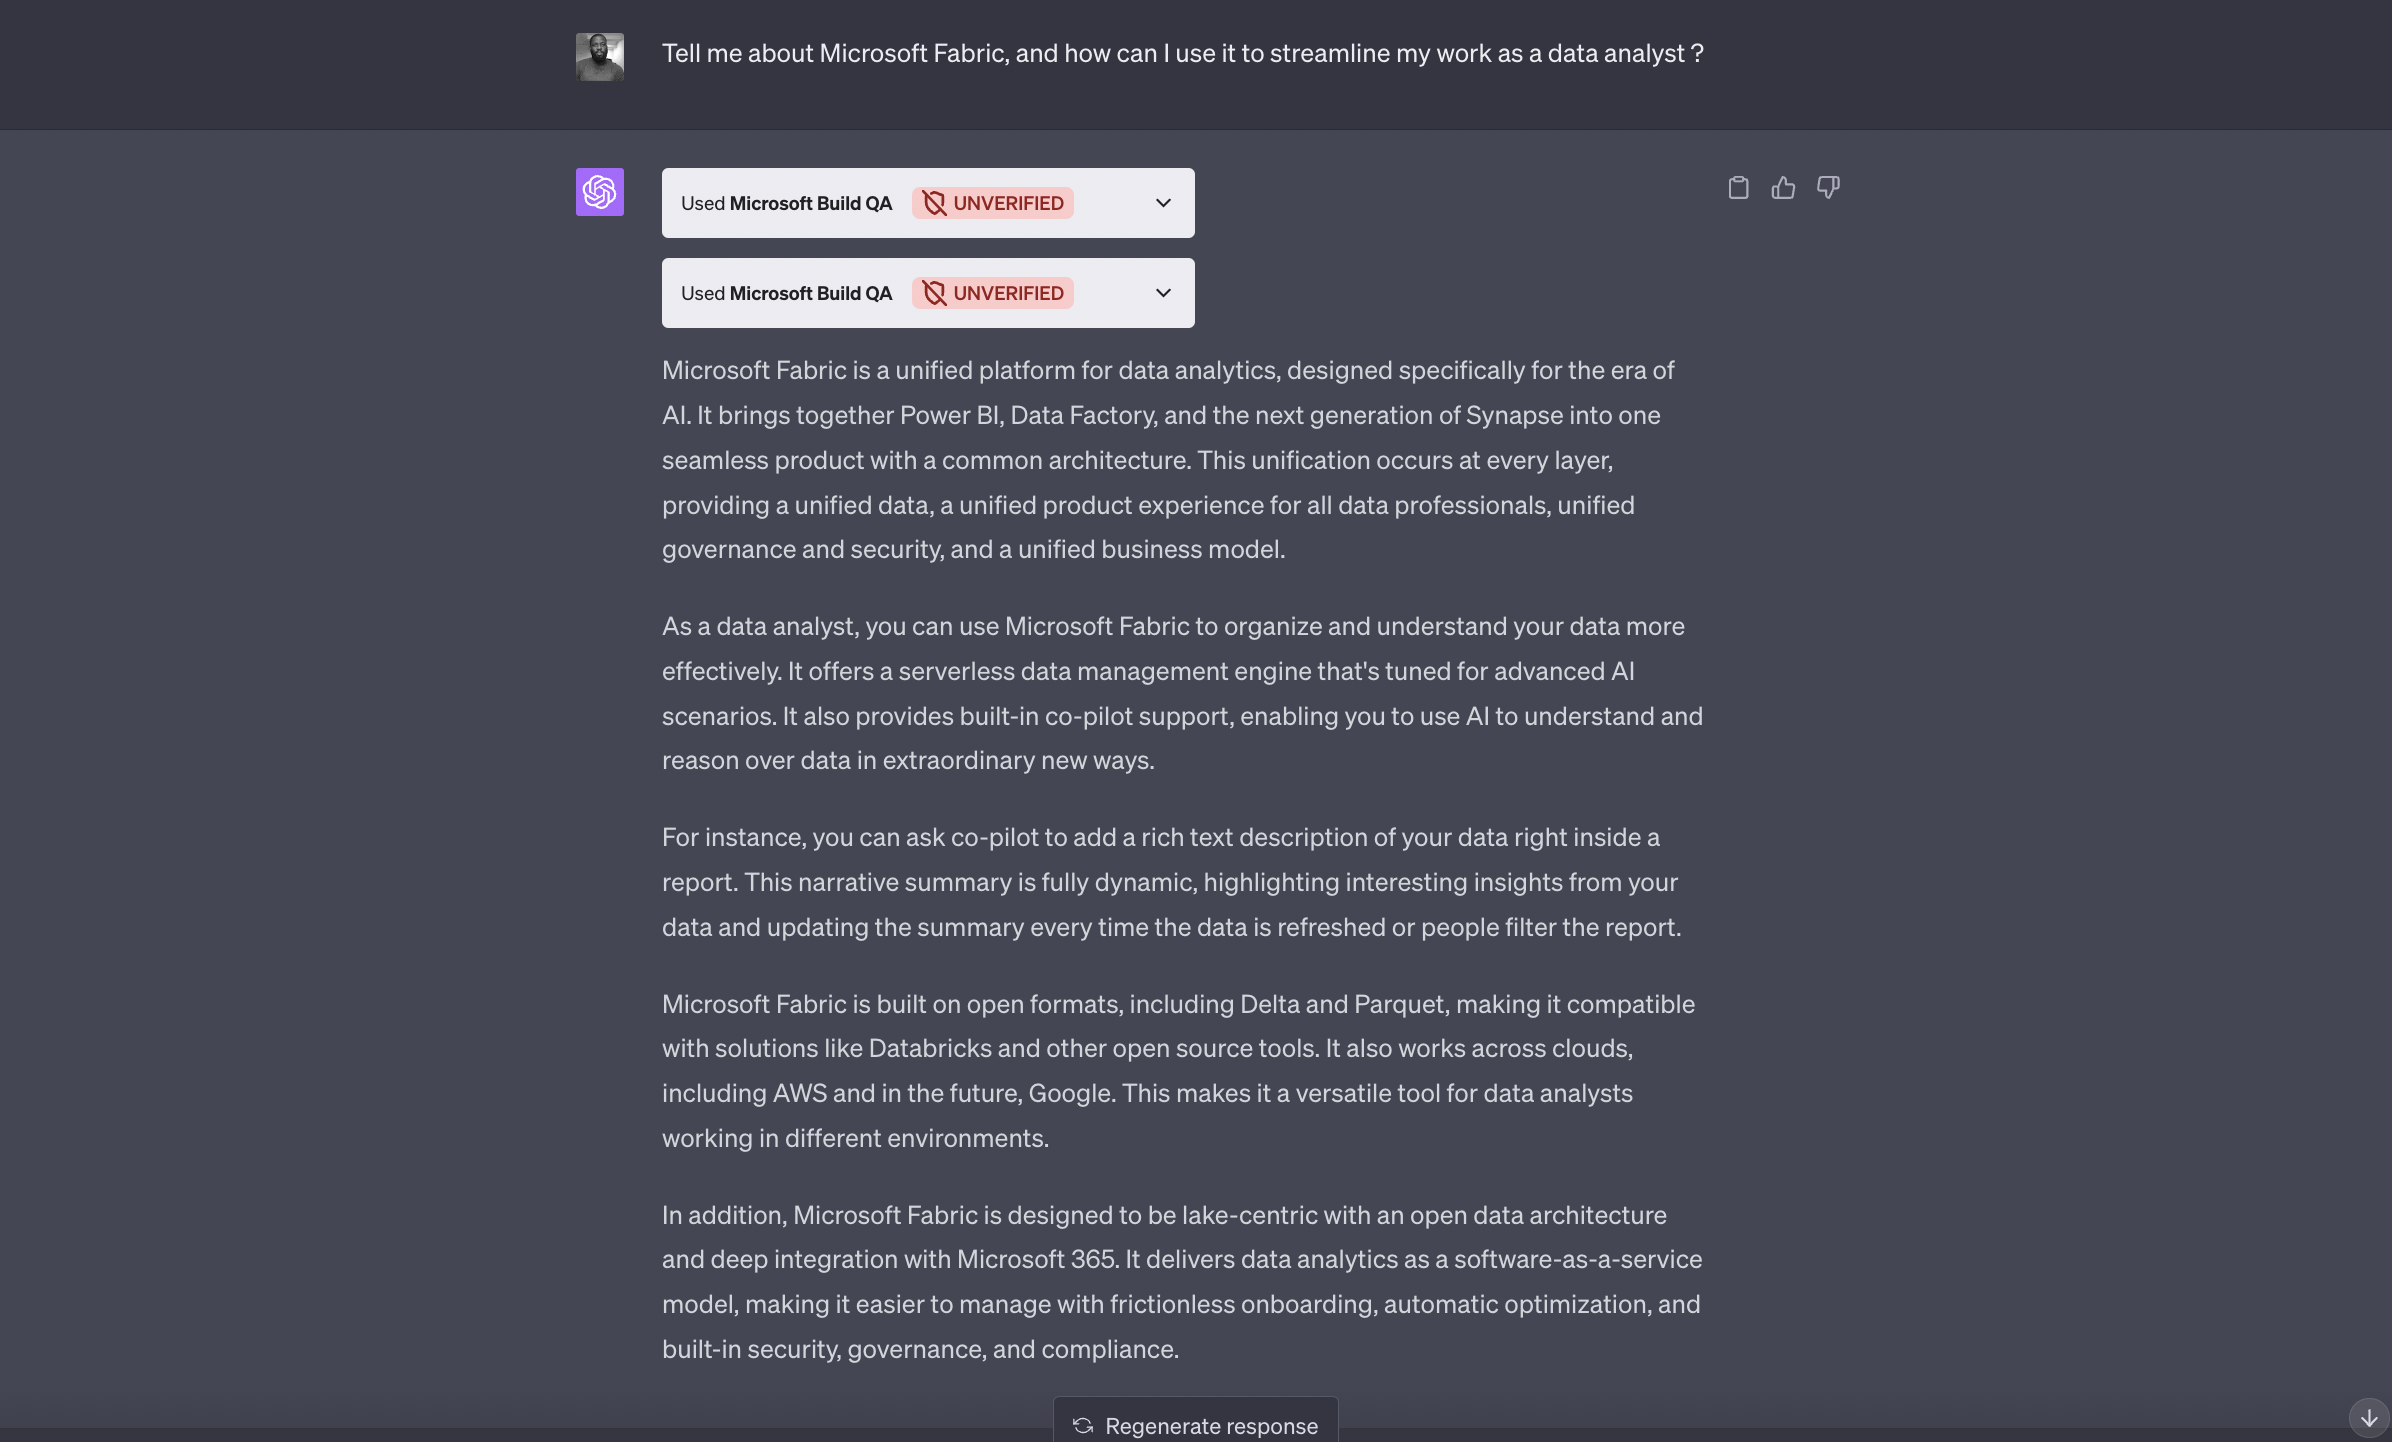
Tell me about Microsoft Fabric, and how can I use it to streamline my work as a data analyst ?
Result from Prompt 1
Prompt 2
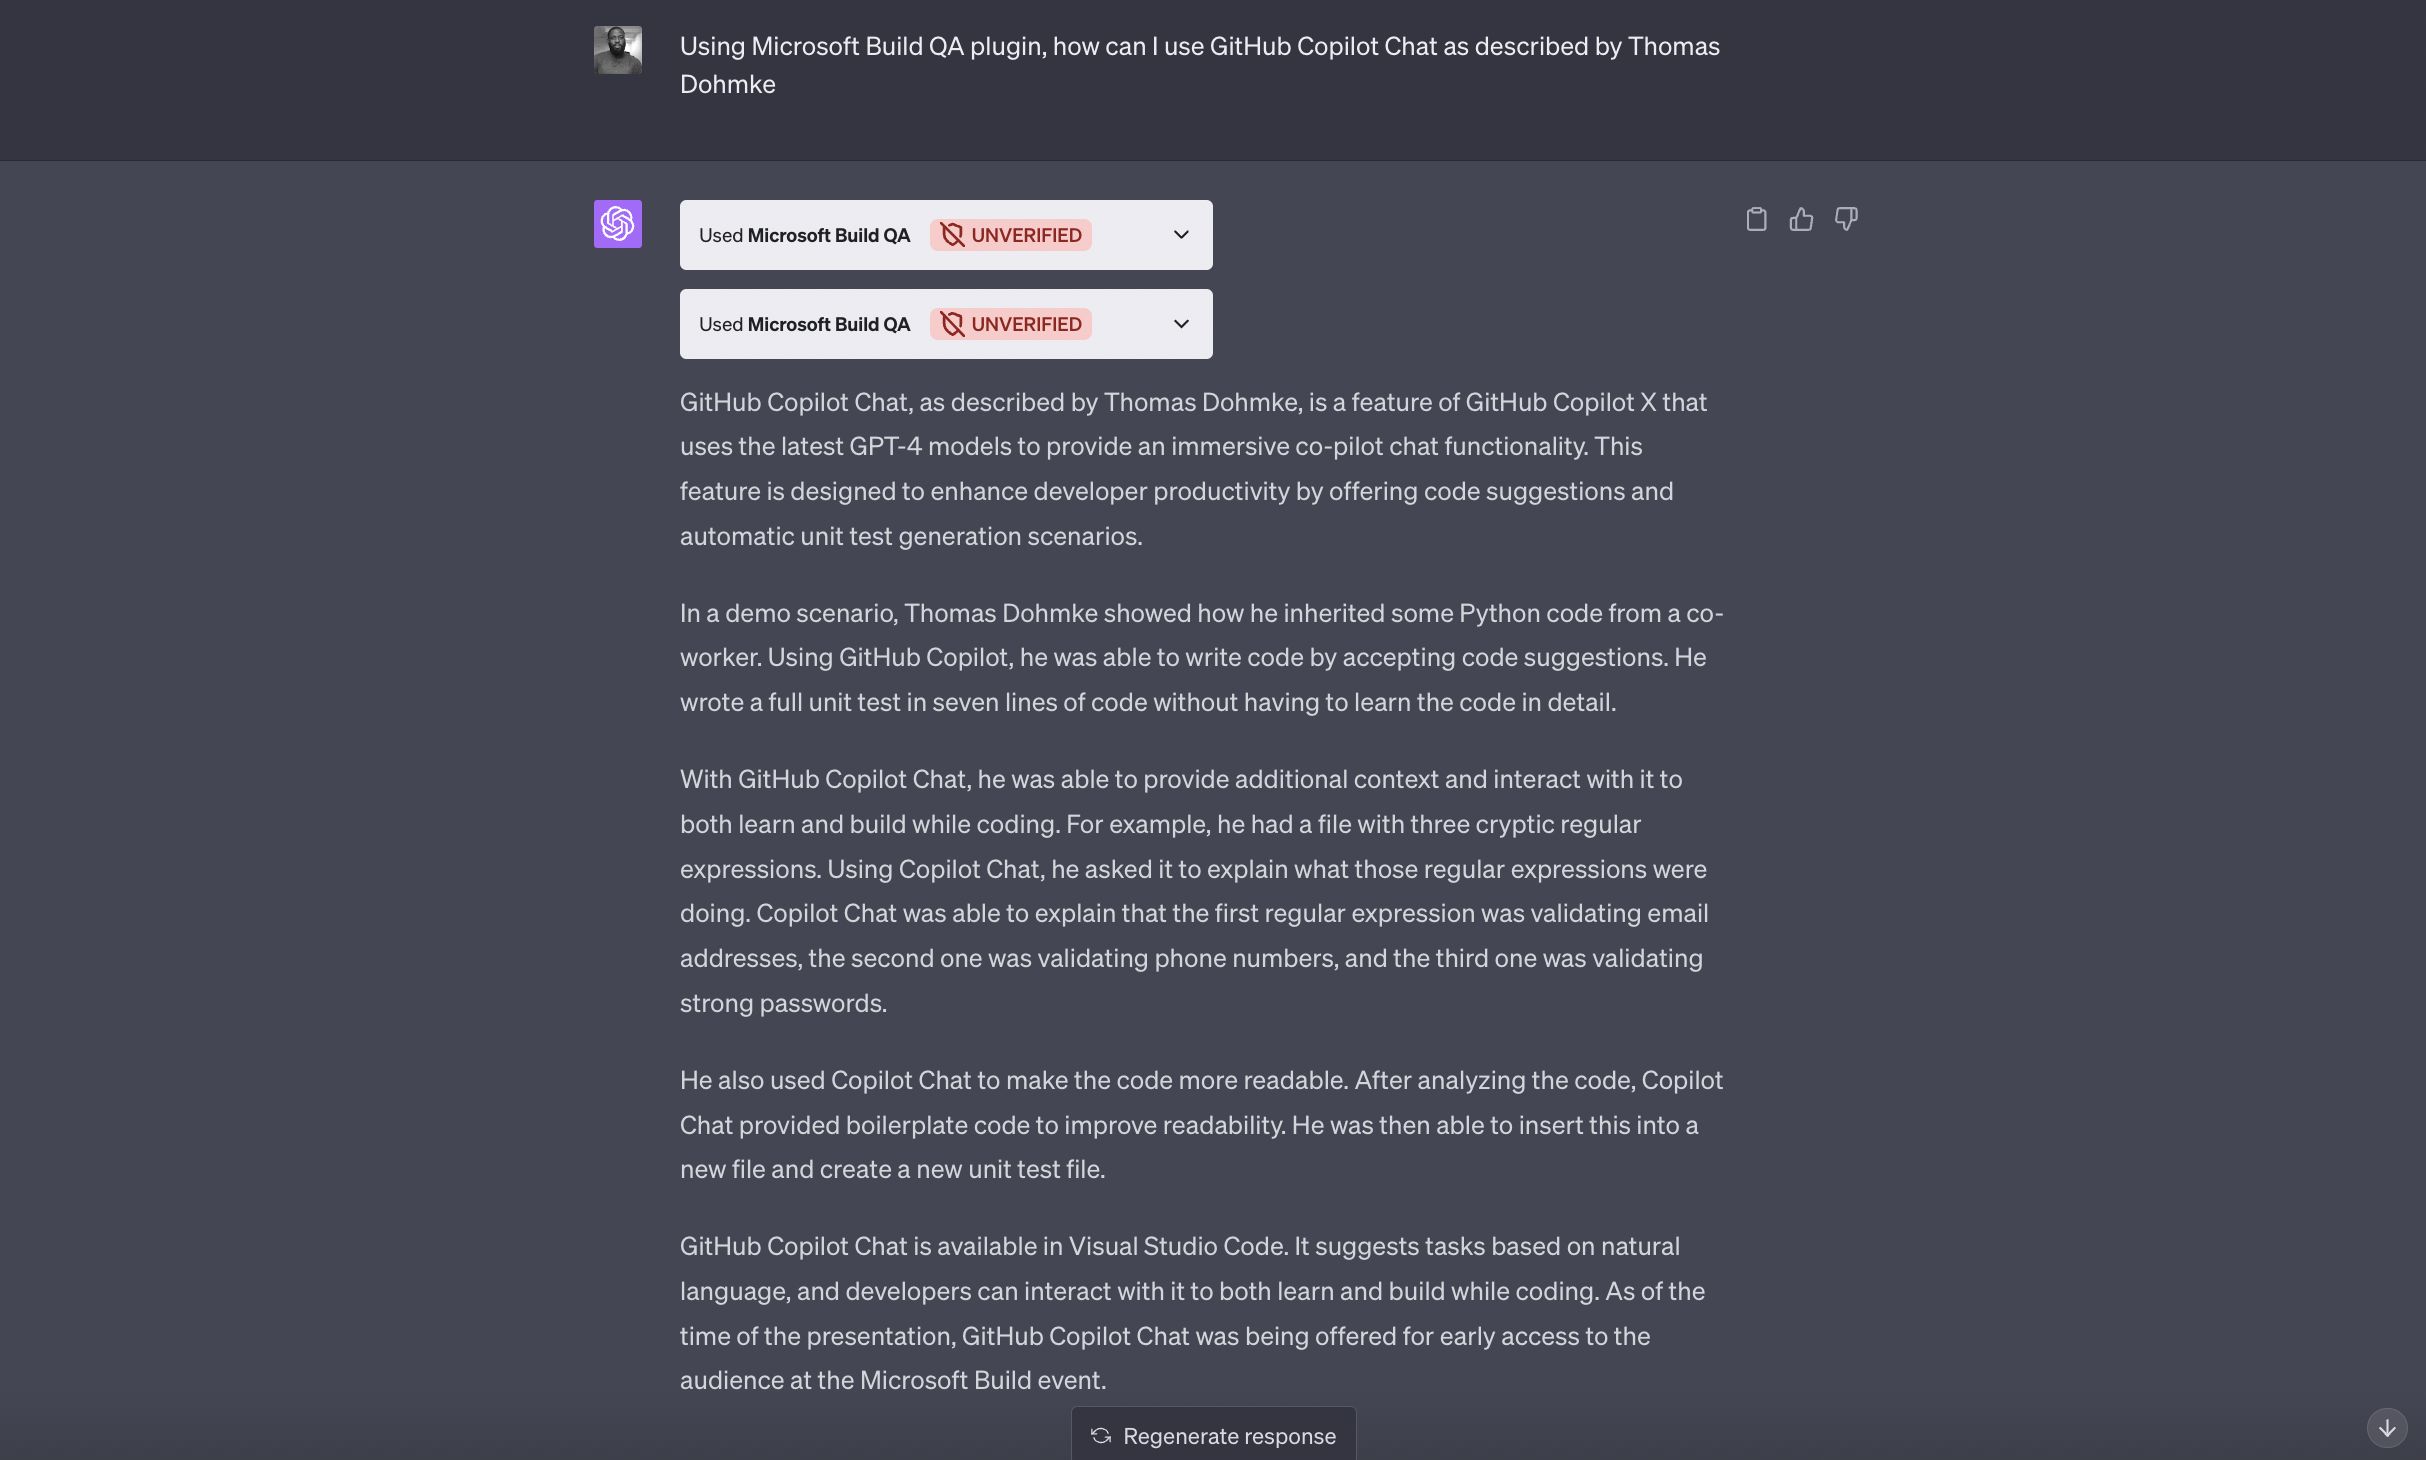
Using Microsoft Build QA plugin, how can I use GitHub Copilot Chat as described by Thomas Dohmke?
Result from Prompt 2
That's it! You've successfully set up a plugin to to interact with the Microsoft Build 2023 Keynote Speech, which is over 2 hours long.
Updated about 3 years ago